Creating a Web Messenger
Flow XO's Web Messenger lets you add a fully-featured chatbot to any website. This guide walks you through creating your first web messenger — from naming it to embedding it on your site — in just a few minutes.
Prerequisites
- A Flow XO account (any plan)
- At least one chatbot flow or AI assistant ready to go
Step 1: Create a New Bot
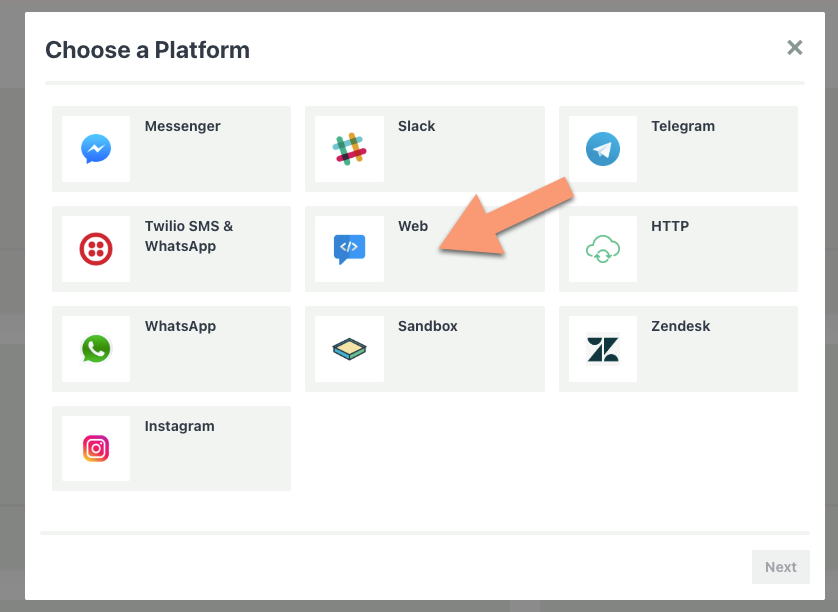
- From your Flow XO dashboard, click Bots in the left sidebar.
- Click + New.
- Select Web as the platform.
You'll land on the bot editor, where all the core settings are right in front of you.
Step 2: Set Up the Essentials
The bot editor shows everything you need on a single page. Work through these fields from top to bottom:
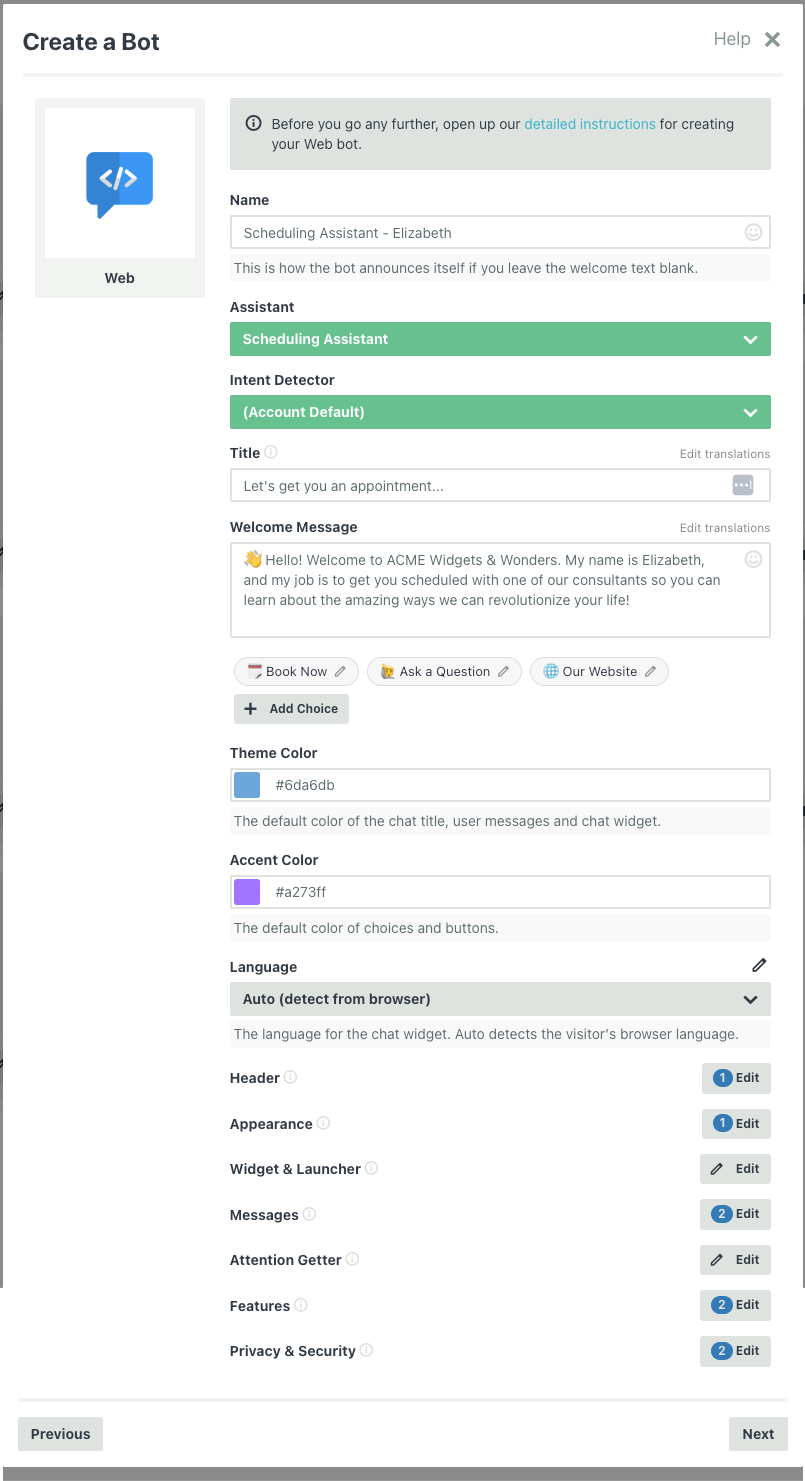
Name
Give your bot a name - this should be a simple name that you can use to identify your bot later if you have several of them, such as "Customer Support Bot" or "Jim"
Assistant (Optional)
If you've created an AI assistant in Flow XO, you can connect it here. The assistant will handle conversations using its configured personality and knowledge base. Leave this set to (None) if you're using flows instead.
Intent Detector (Optional)
If you have previously set up an intent detector (advanced), you can choose it now. Otherwise, this field is safe to ignore for most bots.
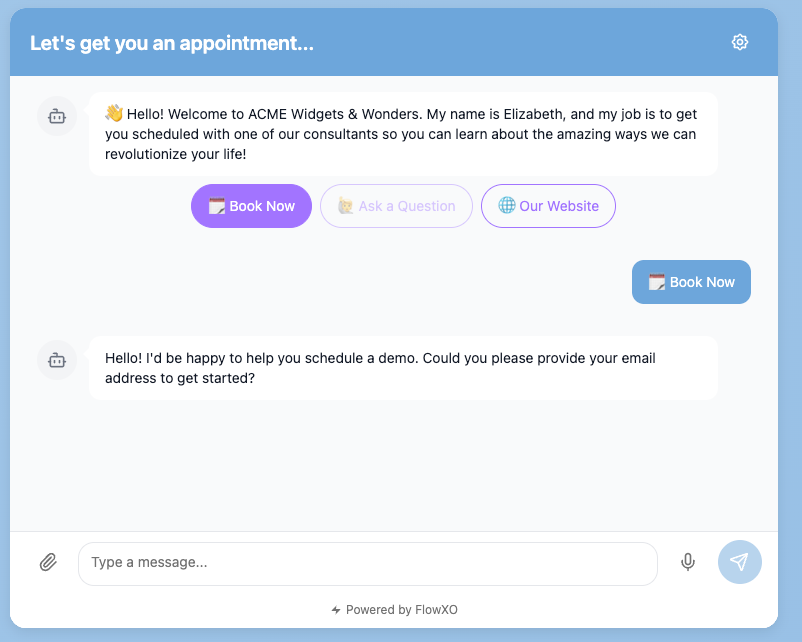
Title
The title appears at the top of the chat window. The default is "Let's Chat!" — change it to whatever fits your brand, like "Hi there!" or "Ask us anything" or if your bot has a name, like "Liza", it could be something like "Hi I'm Liza!".
Welcome Message
The welcome message is the first thing visitors see when they open the chat. Write something friendly that sets expectations:
Hi! I'm here to help you find what you need. Ask me about our products, pricing, or anything else.
Click the emoji button on the right to add personality.
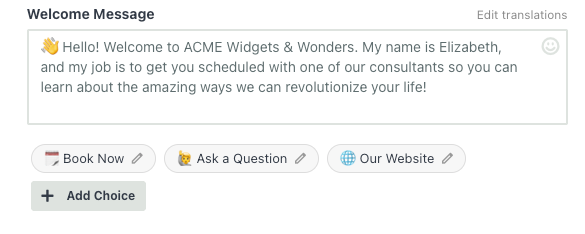
Welcome Choices
Click + Add Choice to create clickable buttons that appear below your welcome message. These give visitors a quick way to start a conversation without typing.
Each choice has:
- Label — The text displayed on the button
- Value — The message sent to your flow when clicked (defaults to the label)
- Type — "Quick Reply" (sends a visible message) or "URL" (opens a link)
Example choices:
| Label | Type | Value |
|---|---|---|
| Browse Products | Quick Reply | show products |
| Talk to a Human | Quick Reply | live agent |
| Visit Help Center | URL | https://help.example.com |
Theme Color & Accent Color
- Theme Color sets the primary color for the header, user message bubbles, and the chat widget chrome. The default is
#6f5fe8. - Accent Color sets the color for buttons and interactive choices.
Pick colors that match your brand. You can enter hex values directly or use the color picker.
Language
The default is Auto (detect from browser), which detects the visitor's browser language and uses the closest available match. You can select a specific language to force the same UI language for all visitors.
For translating your own custom text (title, welcome message, choices) into multiple languages, see Internationalization and Translation.
Step 3: Go Live
Your bot is ready to share. Click the Authorize tab to see your options.
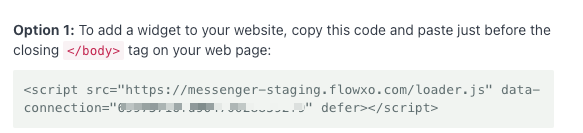
Embed on Your Website
The simplest way to add the messenger to your site is with a single script tag. Copy the widget code and paste it just before the closing </body> tag on any page:
<script src="https://messenger.flowxo.com/loader.js"
        data-connection="YOUR_CONNECTION_TOKEN"
        defer></script>
Replace YOUR_CONNECTION_TOKEN with the token shown on the Authorize tab.
That's it — the messenger will appear as a floating chat widget in the bottom-right corner of your page.
For more ways to deploy (WordPress, Google Tag Manager, single-page apps, inline embeds), see Installation & Embedding Options.
Share the Hosted Link
Every web messenger also has a hosted page — a standalone URL you can share directly. This is also a great way to test out your bot:
https://messenger.flowxo.com/chat/YOUR_CONNECTION_TOKEN
This is great for email signatures, QR codes, social media bios, or anywhere you want a direct link to your chat. You'll find the exact URL on the Authorize tab.

Step 4: Test It Out
Open your website (or the hosted link) and click the chat launcher. You should see:
- Your title in the header
- Your welcome message
- Your welcome choices as clickable buttons
Try clicking a choice or typing a message to make sure everything responds correctly.
Customizing Further
This guide got you up and running with
the basics, but there's much more you can do. Below the core settings, you'll see groups like Header, Appearance, Widget & Launcher, Messages, Attention Getter, Features, and Privacy & Security — each with an Edit button that opens detailed settings.
These guides cover everything:
- Customizing the Web Messenger — Colors, themes, avatars, sounds, widget size, attention getters, and all visual/behavioral settings
- Customizing with CSS — CSS variables, class selectors, and advanced styling recipes
- Installation & Embedding Options — Hosted pages, inline embeds, URL filtering, and positioning
- Going Deeper with the JavaScript API — Programmatically control the messenger, identify users, and respond to events
- Using Metadata — Identify users, track page context, and collect visitor data automatically
- Internationalization and Translation — Translate the messenger into multiple languages